
We tried Subminimal’s NanoFoamer V2 and FlowTip Jug to make café-quality microfoam and latte art designs at home.
BY VASILEIA FANARIOTI
SPECIAL ONLINE CORRESPONDENT
Photos courtesy of Vasileia Fanarioti
Today at Barista Magazine Online, we are putting the focus on those who want to make café-quality microfoam at home without breaking the bank. We are testing Subminimal’s very own NanoFoamer V2 and FlowTip Jug; the NanoFoamer is a handheld, battery-operated milk foamer that Subminimal says will produce café-quality microfoam, perfect for making latte art at home. The FlowTip Jug is an ergonomic milk jug with a spout that is designed to help with latte art pouring. So, how did they perform? Read on to find out!
Unboxing The Subminimal Bundle
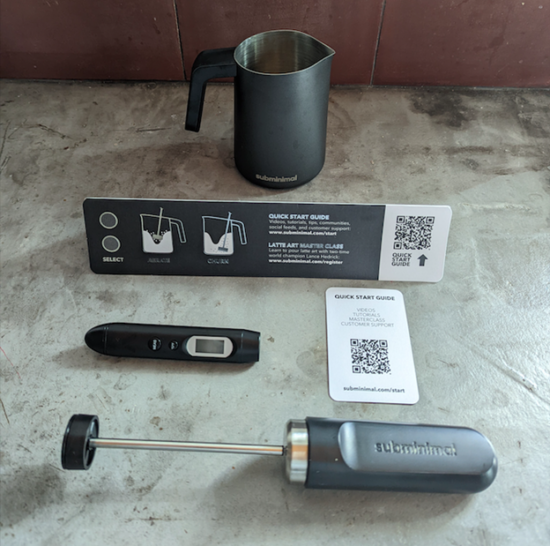
The Subminimal Bundle includes the NanoFoamer V2, the FlowTip Jug, and their thermometer. The NanoFoamer package includes the foamer itself, two NanoScreens, a protective hood, and an adhesive wall mount. It also comes with a user manual and a certificate of authenticity. An added bonus: an access code for a free Latte Art Master Class.
This is the second version of the NanoFoamer; it has been upgraded with a new screen design that features clip-on NanoScreens, a replaceable polycarbonate impeller, ultra-light touch on/off switch, and stainless-steel motor housing. The new model is also rechargeable. The FlowTip Jug is a black Teflon-coated latte art jug with an ergonomic handle and a sharp tip. It is stovetop compatible and its package includes one cleaning brush. The Subminimal Bundle further includes a contactless digital thermometer to help you get the perfect temperature for your milk.
Frothing with the NanoFoamer V2
I decided to use both 3.5% fat dairy milk and almond milk to see how the NanoFoamer V2 would work with each. The first thing I had to do was heat up my milk on the stove using the FlowTip Jug. I had no issues using my stove or my micro-burner to do this, as the jug is compatible with both. One thing I did notice: The jug handle becomes slightly overheated from the stove, but not enough to cause any major discomfort.
I heated the milk until it reached around 60°C (140°F). The digital contactless thermometer was very handy for this: I could easily check the milk temperature by hovering it over the milk surface. Once the milk was heated, it was time to clip the NanoScreen onto the foamer. There are two NanoScreens—one for superfine foam and one for fine foam. I used the fine foam for both dairy and almond milk, as Subminimal suggested it is easier to start with.
Then, I inserted the frothing head of the NanoFoamer V2 into the milk and turned it on. Subminimal’s quick start guide suggested churning the milk for only a few seconds for a flat white. I started in the middle to incorporate air, then moved to the side to continue churning and blending the foam. I found the button very easy to press and switch between speeds 1 and 2.
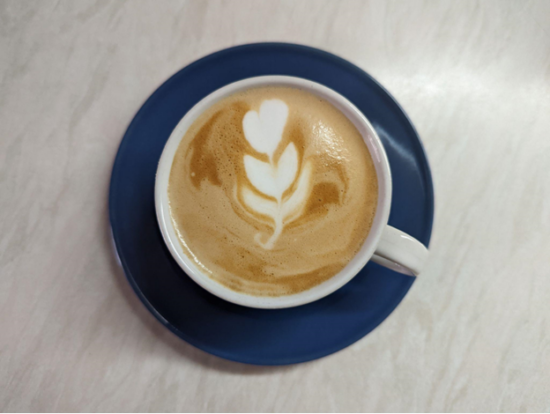
After about 7 seconds of churning, I had some very nice microfoam for both my dairy milk and almond milk. I was able to make latte art with both, although I must admit my latte art skills are a bit rusty. The almond milk foam was thinner than the dairy milk foam, but I was still able to make a design. The FlowTip Jug was a good fit for my hand; the sharp tip made it easy to pour the milk. Churning for as long as 15-20 seconds will also get you a stiffer foam, which is great for cappuccinos. What’s more, there is an auto shutoff after 90 seconds to prevent the ultra-fast motor from overheating the housing.

Who Are Subminimal Products for?
The Subminimal Bundle is ideal for coffee lovers who want to make café-quality milk foam at home without having to buy an expensive espresso machine. I found the NanoFoamer V2 very easy to use and clean. It produces great microfoam, and with some practice, you can make beautiful latte art. Subminimal’s quick-start guide even includes information on how to practice without wasting milk by using cold water and dish soap. Plus, the free Latte Art Master Class is a sweet add-on!
The FlowTip Jug is a great addition. It’s compatible with stovetops and micro-burners, and the contactless digital thermometer is a handy tool to ensure you get the perfect milk temperature. All in all, Subminimal has taken the guesswork out of making great microfoam at home. The quality of the products makes the price tag more than worth it.
If you are looking for an easy-to-use, reliable, and affordable way to make great microfoam at home, then this might be the perfect product for you. Check out the Subminimal website for more tips, videos, and tutorials!
ABOUT THE AUTHOR
Vasileia Fanarioti (she/her) is a senior online correspondent for Barista Magazine, and a freelance copywriter and editor with a primary focus on the coffee niche. She has also been a volunteer copywriter for the I’M NOT A BARISTA NPO, providing content to help educate people about baristas and their work. You can follow her adventures at thewanderingbean.net.